Bench work is one thing about modeling that I enjoy. The smell of fresh lumber being cut and assembled into something that you designed and built is very satisfying. I'm not starting on the bench work anytime soon, sorry to disappoint. However, the planning stage is well underway. With the Bench work I want to have sections which can be put up quickly by one person (and built cheaply as well). This requires that the modules be light, simple, yet sturdy.
I have made many types of bench work. I've used the classic plywood top with reinforcements beneath. This type was cheap to build, but 3/8" plywood with 1X4's can be a bit heavy. I've also tried to use a hollow core door. This was very cheap, but was somewhat bulky. I've also built an 8' by 12' modular layout for O scale, which was effective. The plywood was heavy, but the sections were manageable. I've even built an N scale layout from nothing more than a piece of foam insulation board. This was very light, but was fragile.
Another aspect of bench work is getting the legs to be sturdy but light. My n scale layouts never even used their own legs, I'd simply put the layout on a table whenever I took it to a show. The layout had it's own table in the house at home. My modular O scale layout used a series of legs that had black plastic brackets. These legs were quite sturdy once set up, but were very unstable until every module was in place. Furthermore, bolts had to be inserted through the top, and right in the middle of the scenery of the layout. If I had been modeling summer, a few bushes and trees would have taken care of the problem; but I modeled winter. Everything looked great except for those smooth, round bumps every four feet. The HO scale layout that I built on a door also didn't use legs, but rather rested on a pair of file cabinets. A word to those wanting permanent layouts, file cabinets make great bench work because they don't take up too much space, but can double as storage for the extra trains and other equipment. A file cabinet under every joint between sections would work quite well.
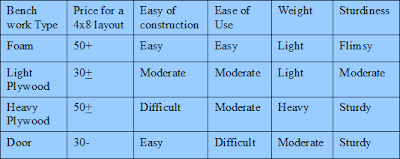 The Table illustrates my experience with the following bench work types; foam, light plywood (less than 1/2"), heavy plywood (greater than 1/2"), and the hollow core door.
Foam is very easy to build with, very easy to use, and is very light. However, foam is expensive (blue, pink, or green not the white which is not very useful) and foam requires backing such as plywood. Foam is best used as a scenery base because contours can be made in the foam.
Light Plywood which is under 1/2" in thickness is versatile, but requires power tools to be useful which makes plywood significantly more difficult. Also, without a smart design, bench work made from very thin plywood can be flimsy. If built correctly however, then a very useful bench work that is very light can be built. For a portable layout, light plywood and foam board make a good pair.
Heavy plywood is very good for larger and heavier layouts that must be built at a reasonable cost. For heavy plywood, a table saw is needed or strongly recommended to make accurate cuts. Table saws are not for the faint of heart, and can be dangerous so heavy plywood is not a good idea if just starting out and you have no shop experience with a table saw. However, if heavy plywood is used, a very durable layout will be built which can withstand the rigors of cross country travel or the weight of a large indoor layout. plaster can be used in conjunction with the heavy plywood on indoor layouts. This system of bench work is one of the oldest and most trusted.
A hollow core door, though light and cheap, is not designed for bench work purposes. Hollow core doors also are not very sturdy by themselves, in fact most door framework is merely 1x2 cut lumber and a very thin plywood skin. I have proved that a small indoor layout on a door is possible, and even successful if designed properly.
For portability, plywood and foam makes the most sense since each covers the other's shortcomings. Foam is not sturdy, but plywood is just strong enough to be useful. Plywood is not as easy to use as a scenery base, but foam can be carved with ease. Finally, both light plywood and foam board are very light, and the combined weight is easily handled by one person when designed correctly.
So what is the correct design then? Well, I searched high and low for a decent design, but the best I can recommend is the following video:

Red sections represent 90 degree turn sections and blue represent 96" length straight sections. This overall plan would allow for a switching layout that takes place along all four walls of a garage. The overall dimensions in this set up are 13 by 26 feet, taking up only one stall of a garage. The gap between the blue sections is an entry point. I do not want to have to crawl under or squeeze through a layout to get to the center for operations. this particular set up gives me a comfortable 30" wide space to walk through. That may seem narrow, but look at any mobile home or older house and most doorways are 32" wide, so 30" is not big trick to navigate. I'm also proud to say I'm not overly fat, and don't plan to get there for a couple of decades at least, so this set up is just my size. With the addition of another curve module and a straight module, the layout could become a racetrack shape with a dimension of 10 by 34 feet or 18 by 26 feet depending on the set up. Indoors, this layout seems big, and it is; however so is the scale. I'll recommend that if you don't have almost a garage sized space, don't plan on an indoor layout with realistic curves, realistic switches, and realistic track plan. Using short turnouts and sectional track, a switching layout can be built along 12 feet of wall space, but it has the tendency to look toy-like. If you like that look, by all means roll with it; I'm simply stating that I prefer more realistic settings to toy-land, unless in a very appropriate setting such as Christmas.
To transport this layout, which I intend to do, I will require the bed of my Pick up truck. My truck as a full 8ft bed plus a topper that gives 40" minimum vertical space. In this truck the modules would have to be 2 lengthwise side by side staring about 8" off the bed floor due to the fenders. Locomotives, rolling stock and buildings can be placed below this initial layer between the fenders. this leaves me with 32" of headroom for modules that will be stacked 4 high. divide 32 by 4 and I get 8" of vertical clearance for each module. So anything sticking up more than a few inches off the surface of the module will need to be removable. If I build any more modules in the future, they will require their own trailer, so that is something to keep in mind if wanting to build in 1:20.3 scale.
Thank you.
--James Willmus
I have made many types of bench work. I've used the classic plywood top with reinforcements beneath. This type was cheap to build, but 3/8" plywood with 1X4's can be a bit heavy. I've also tried to use a hollow core door. This was very cheap, but was somewhat bulky. I've also built an 8' by 12' modular layout for O scale, which was effective. The plywood was heavy, but the sections were manageable. I've even built an N scale layout from nothing more than a piece of foam insulation board. This was very light, but was fragile.
Another aspect of bench work is getting the legs to be sturdy but light. My n scale layouts never even used their own legs, I'd simply put the layout on a table whenever I took it to a show. The layout had it's own table in the house at home. My modular O scale layout used a series of legs that had black plastic brackets. These legs were quite sturdy once set up, but were very unstable until every module was in place. Furthermore, bolts had to be inserted through the top, and right in the middle of the scenery of the layout. If I had been modeling summer, a few bushes and trees would have taken care of the problem; but I modeled winter. Everything looked great except for those smooth, round bumps every four feet. The HO scale layout that I built on a door also didn't use legs, but rather rested on a pair of file cabinets. A word to those wanting permanent layouts, file cabinets make great bench work because they don't take up too much space, but can double as storage for the extra trains and other equipment. A file cabinet under every joint between sections would work quite well.

Foam is very easy to build with, very easy to use, and is very light. However, foam is expensive (blue, pink, or green not the white which is not very useful) and foam requires backing such as plywood. Foam is best used as a scenery base because contours can be made in the foam.
Light Plywood which is under 1/2" in thickness is versatile, but requires power tools to be useful which makes plywood significantly more difficult. Also, without a smart design, bench work made from very thin plywood can be flimsy. If built correctly however, then a very useful bench work that is very light can be built. For a portable layout, light plywood and foam board make a good pair.
Heavy plywood is very good for larger and heavier layouts that must be built at a reasonable cost. For heavy plywood, a table saw is needed or strongly recommended to make accurate cuts. Table saws are not for the faint of heart, and can be dangerous so heavy plywood is not a good idea if just starting out and you have no shop experience with a table saw. However, if heavy plywood is used, a very durable layout will be built which can withstand the rigors of cross country travel or the weight of a large indoor layout. plaster can be used in conjunction with the heavy plywood on indoor layouts. This system of bench work is one of the oldest and most trusted.
A hollow core door, though light and cheap, is not designed for bench work purposes. Hollow core doors also are not very sturdy by themselves, in fact most door framework is merely 1x2 cut lumber and a very thin plywood skin. I have proved that a small indoor layout on a door is possible, and even successful if designed properly.
For portability, plywood and foam makes the most sense since each covers the other's shortcomings. Foam is not sturdy, but plywood is just strong enough to be useful. Plywood is not as easy to use as a scenery base, but foam can be carved with ease. Finally, both light plywood and foam board are very light, and the combined weight is easily handled by one person when designed correctly.
So what is the correct design then? Well, I searched high and low for a decent design, but the best I can recommend is the following video:
This video is titled "Building Your First Model Railroad." This video was from Model Railroader Magazine a few years ago, and has been seen by thousands of starting hobbyists. I strongly recommend picking up a copy of this video so you can watch it completely. The bench work is genius and can be adapted for portability with only slight modifications. For my module, I plant to use only one sheet of plywood, some will be stripped off for use as the frame, and the remaining portion will be used as a sturdy top.
In addition, I plan to add layers of foam so that the module can have scenery both above and below the right of way. The final layer for the bench work will be a cut-to-fit ceiling tile right of way. For G scale, I don't think foam alone can support the weight of the larger locomotives, or the pressures of hand laid track, so I'll use ceiling tile like what is seen in commercial buildings as a roadbed.
I have not yet decided on the legs, although I do like the legs used in the video. While cruising through Lowe's the other day, I noticed saw horse leg brackets. A saw horse looks like that yellow metal object in the video. The brackets are supposed to be used with 2X4 legs which are somewhat heavy, but definitely sturdy. Furthermore, a sawhorse forms an 'A' shape with the legs. A triangle, like an arch, is very sturdy. The brackets were 5.99 a pair, and then I'd have to add on about 12 dollars worth of 2x4 to make up the legs. The result is less than 20 dollars for one saw horse. The first module would require two saw horses, plus one for every module built thereafter.
For bolting the modules together, I again looked at Model Railroader magazine and saw that quikgrip clamps (similar in design to a bar clamp) can be bought cheaply and used to secure modules together. Only a light bolt or two would be needed to secure the modules to the sawhorses. One sheet of foam insulation, one sheet of 3/8" plywood, two small sheets of ceiling tile, saw horse brackets, 2x4 saw horse legs, quikgrip clamps, and a few nuts, bolts and screws would cost about $85 for each module, plus 18-20 for the extra saw horse required.
The downside to this design is that the modules must be carried in. The design of the legs in the video would allow for small wheels, or casters, to be used to simply roll the layout around if needed; a definite plus if attending a show by yourself. So the legs have not been figured out yet, or decided upon.
What I have figured out for sure is how big each module should be. In 1:20.3 scale, a train takes up lot of space. Same with the turnouts as well. A typical 3ft gauge #4 turnout in 1:20.3 scale would be at least 18" long, more along the lines of 24". Ad to this less than a foot behind and less than two feet of track in front of the turnout and the whole turnout assembly takes up a minimum of 48" of length along a module. The standard 24" by 48" module just won't due in this large of a scale. Furthermore, the trains are very wide, requiring 8" minimum space between tracks. each track can be no less than 6 inches from the front or the back of the module or else the train my go crashing to the floor if a derailment occurs. On a 24" wide module, there can be only a maximum of 2 tracks with little space ofr other scenery. In order ot avoid a test track feel, the module must be wider. I've decided that 30-32" width is a very good width for a small modular G scale layout. Up to 3 tracks can be installed, allowing for a small yard, but with only 2 tracks, there is enough room for buildings and a fair amount of scenery. In fact, on stretches of single main track, up to 20" of scenery can be placed behind or in front of the track right of way, double track still leaves 12" of module space behind or in front which allows for small buildings, hills, rock cliffs, and tunnels.
Another issue to address is the length of the module. 48" is not enough to be of use, 72" is okay, but there is limited flexibility, but 96" is a great length because the module can still be carried in the back of a truck, but are long enough that twists and turns in the track can be made to give the layout a more interesting and realistic look.
Therefore each module will have a surface are of 30" by 96". With the smallest rolling stock, these modules would suffice on their own. But I also need to have larger turns than 24" radius in order to run larger locomotives and eight wheel rolling stock. I want realistic curves right from the beginning, so 8 ft diameter curves will be a minimum. With eight foot diameter curves, plus 6" of clearance on each side of the curve, the minimum overall diameter for a 180 degree turn is 9ft, but to decrease the number of cuts, and give some extra space, 10 ft will be great, allowing for 9ft diameter curves instead of 8ft. Furthermore, the extra space allows for a roomy 5ft wide center section so running trains from the inside becomes reality. Also, the overall dimensions of a 90 degree module section is 85"by about 38", still small enough to be transported easily.
Thus I have created a general concept for bench work which is very well suited to 1:20.3 scale, or so I believe. Below is the diagram of what I want to achieve within two years:

To transport this layout, which I intend to do, I will require the bed of my Pick up truck. My truck as a full 8ft bed plus a topper that gives 40" minimum vertical space. In this truck the modules would have to be 2 lengthwise side by side staring about 8" off the bed floor due to the fenders. Locomotives, rolling stock and buildings can be placed below this initial layer between the fenders. this leaves me with 32" of headroom for modules that will be stacked 4 high. divide 32 by 4 and I get 8" of vertical clearance for each module. So anything sticking up more than a few inches off the surface of the module will need to be removable. If I build any more modules in the future, they will require their own trailer, so that is something to keep in mind if wanting to build in 1:20.3 scale.
Thank you.
--James Willmus
No comments:
Post a Comment