Tuesday, June 17, 2014

Construction Update 3

In this report, I don't have any extra little things to display, so we'll jump right into construction progress of the module:

Construction:

Over the last week, rains have continued to be a problem, but I'm starting to get more sunny days to work with outside.  To start, the small rock wall I had planned in one corner of the module proved to be a weak point in the design and the glue gave hold.  From experience, I know that if something is falling off this early in construction, it's not worth it to try and keep the piece of foam attached, as it will simply break off.

However, the module itself seems to be holding up well, and everything should be a lot more secure once I put on the end plates and fascia.  I am not doing either of those yet because I want the edge of the layout to be clean, so until I have the dirt and grass on the module, the edges will remain foam.  I found time to make some progress on the module this last week, and the result is the first coat of paint.  Lacking a paintbrush, I decided to waste no time and went ahead using a kitchen sponge as a brush.  The results aren't the greatest, and the foam will need a second coat of paint, but it is progress anyhow:

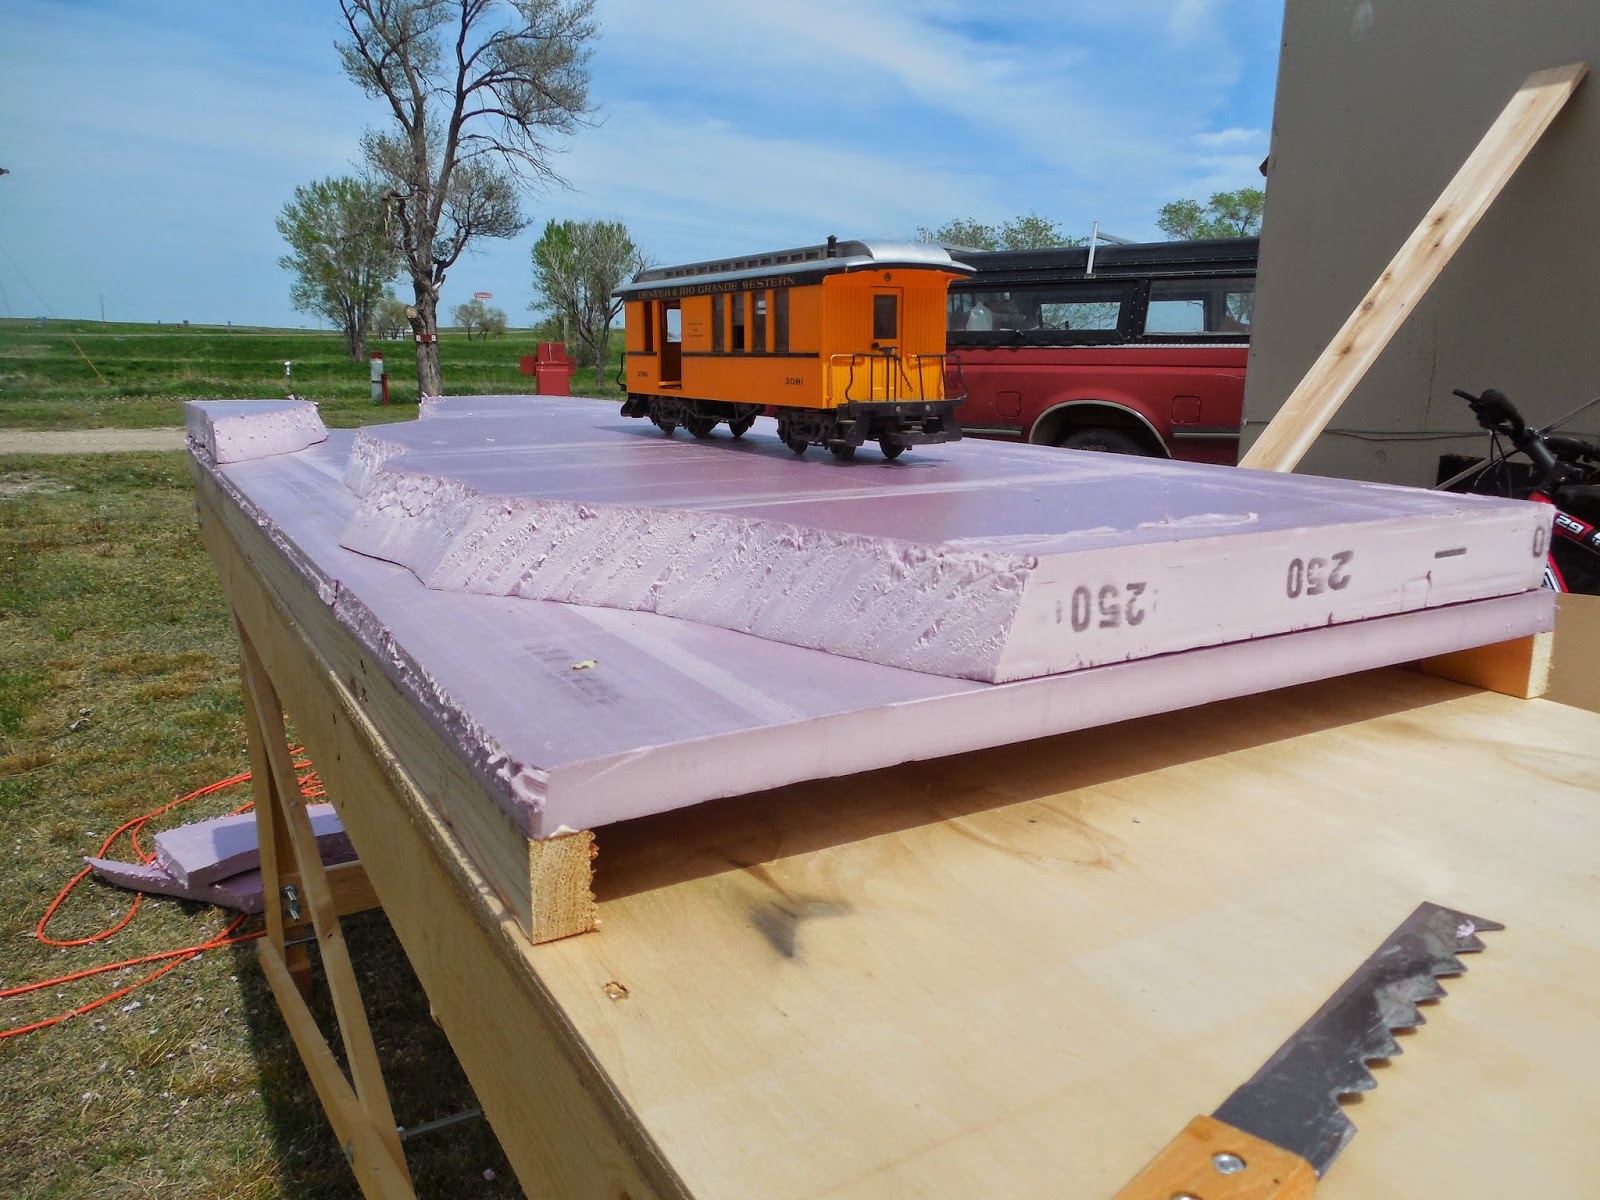
 Here is the module as it stood last week.  I applied fiberboard ceiling tile (the type with all the tiny holes) to the top of the foam to serve as my road bed.  I did this for two reasons, to support the weight of the trains and to provide an additional layer of sound deadening material.  The board was secured with Elmer's wood glue, but any foam safe adhesive could be used for this  A great benefit to fiberboard as roadbed is that it can be shaped and beveled to get a slope that is prototypical, whereas foam might take a lot more time.  TO sand the fiberboard, I used a sanding sponge with what appeared to be 80 grit sandpaper surfaces.  One trick is to keep the fiberboard edges rough after the 80 grit sanding, as the surface will hold ballast better than if it were smooth.

 The first thing I painted was the dirt.  The kitchen sponge an be seen on the right side of the photo, and in the middle of the picture is my paint bottle.  For this, I used a tan color, although umber mixed with white and a slight amount of yellow would do the trick just fine.  Actually, paint color is more of a personal preference, any type of brown would work just fine.
 Next, I painted over the still wet tan paint with burnt umber, which has a lot more red to it and thus is a bit more 'rusty' and darker.  The result is a mix of the tan and the burnt umber to create the river bed.  Why the different color?  Next time you walk along a gravel path and notice a puddle, take note of the different colors around the puddle.  Wet surfaces are usually darker than dry surfaces, especially dirt.  And so, since I have a river bed, the river's bottom will be wet and thus requiring a darker color than the tan.  Again, this is just personal preference.
 Lastly, I painted the fiberboard flat black.  This will give the ballast some depth when ballasting is done.  Grey, or some color similar to the ballast used will work as well.

And there's the result of my day off (that also happened to be sunny).  Next progress update, I will begin to lay railroad ties, talk about rail height, and perhaps some structure construction!  The first module is starting to come together!

Side Note

Seeing that I have limited space, I will be unable to have more than a few modules in the foreseeable future.  These first modules I am trying to get the construction down to a tee, and so this railroad is more of a large experiment.  However, as railcars and locomotives accumulate, more and more demand will arise for a larger layout.  Once a permanent (or suitable) home for such a railroad is found, then this railroad may grow to a decent size.  But for now, I am focusing on three things:  Fn3 trains on a small layout, portability, and ease of construction.

--James

Sunday, June 8, 2014

Construction Update 2.

Okay, this took a bit longer than I had hoped to put on the Internet, but construction was hindered by rain and cold temperatures.  The weather should start to warm up any day now, and should stay that way for a good amount of time, so hopefully I can make some progress!

However, I have managed to get a couple things done:

Building Research

I have been researching buildings that I want on this first section.  I've settled on Forks Creek for the setting due to an extremely tight canyon.  In real life, this was a junction where the north and south branches of Clear Creek joined together.  The railroad had a wye which used two bridges (three?) and later on, a tunnel, to make the junction.  While I won't model the full wye, I will be 'modeling' the Forks Creek Concept with a heavy dose of artistic license.  Forks Creek had a water tower, station, freight shed and a couple of smaller supply buildings.  It appears to also have had a siding down the tracks where the water tower was and possibly a coal bunker.  Below is a map that I quickly drew to describe the scene:

While not to scale (or proportion), this illustration provides a rough idea of Forks Creek.  The grey are the canyon walls, the brown is the flood zone, black consists primarily of structures (including the two buildings, water tower, and the bridges), and the red which is where the tracks went. I will be focusing primarily on the track with the structures, and the water tower.  Bridges may come later, and if this railroad ever gets big enough to warrant a junction, Forks Creek May expand.

So then what sort of buildings am I looking at?  Lucky enough, the railroad up Clear Creek is well photographed, and a great online collection of photos is narrowgauge.org.

The photos below come from the website's Ted Kierscey Collection of photographs from around Forks Creek.  Photos belong to Mark L. Evans.  If wishing to comment or ask questions, please go directly to him at his website, I do not own these photos and I am only using them for education purposes.  Again, I do not own these photos.


This photo shows the two main buildings I am concerned with for this first module.  The building in the foreground has "refreshments" written on it, which must mean it is a building intended for tourists, and is likely part of the station.  The building behind appears to be the actual station, stationmaster's quarters, and freight shed.  Both buildings would have regular trains of passengers, and both would receive frequent shipments of food and supplies.  

In this photo we can clearly see the station/freight shed/crew quarters building.  While it might be a cool thing to model in the future, I will be not having a turnout right in front of this building so that I can park cars on the siding without fouling a turnout.  This is the first bit of artistic/modeler's license I've taken out for this project.  In the right edge of the photo, just above the last passenger car, is the water tower and freight/coal shed which I will have on the second module.  For now, the whole scene will be compressed into two, 6 foot modules.  In the future, I can add about 6 more modules to make the full wye.

So there's a look at the buildings I plan to model.  I don't plan to take any more photos from the archive out or respect of copyright laws  However, I will reference this web collection in the future.

Construction

I did manage to make some progress on the first module before all the rain hit.  So below is a summary of my module progress up until now:


I have managed to sand down the rough edges, and I have also added ceiling tile (update 3 coming tomorrow or next day) as road bed.

Friday, May 23, 2014

Construction Progress Report 1.

FInally, the long awaited Clear Creek Project (by me at least) has begun this week.  I tried out several different designs, in different sizes, to see which would work best for my situation, and as it turns out, the most compact design was the first one, where each module is built to have all buildings, trees, and tall objects removed and packed into boxes.  So that is the design I settled on.  I also settled on Forks Creek, which I will talk about in different posts, as the starting point for the railroad.  Essentially, Forks Creek is a junction where the mainline up Clear Creek could go up the North Fork to Black Hawk, or the South Fork to Georgetown and Silver Plume.  This little piece of the road saw a lot of traffic.  What really makes Forks Creek a good starting point for a compact Fn3 scale layout is that Forks Creek was at the bottom of a steep canyon that was very narrow.  So narrow that the buildings built along the track overhung the river.  The only change of the track arrangement I'm doing is adding a spur so that I can have switching operations.  I also have hte opportunity for a tunnel and bridge in later modules.

Anyway, here is Today's construction progress:


 I started with a 1x2 frame, which was cut to have an overall outer dimension of 24 inch by 72 inch.  This was then glued to a 1 inch thick sheet of foam board, weighted down and clamped tight for around 30 minutes.
 I then cut the 1 inch thick foam board to size so that it was flush with the lumber frame.  As can be seen, I have not added any endplates yet, or a fascia.  Those will come after the final shape of the module has been finalized and I'm able to cut lumber and fill gaps between where the fascia will be joined to the module.
 I then proceeded to use a 2 inch thick piece of foam board to be the sub-scenery base.  SInce hte tracks followed a river, this will be cut to allow a river channel along the section.
 The passenger car is an LGB model that I'm using as a standard car size.  Technically, the car is 1:22.5 scale, but I will be using very small 1:20.3 size equipment, so clearances will be about the same.  This particular section will have one turnout, having a spur serving the station, guard shack, office, and freight building and the other acting as the mainline.
 The route of the river was carved out of the top layer of foam, keeping in mind track clearances and allowing room for the buildings.


 And using extra pieces of foam, I built up bot h sides of the river to hint at this being in a valley.  I will need to do a backdrop of some sort that gives the feeling this section is at the bottom of a river canyon.  Perhaps a textured backdrop?  More on that in future updates.
And that pretty much sums up my day's work.  Next update, I'll look at building sizes and will be drawing up ideas for the buildings to be used on this section.  I may also put together the framework for another module.  The foam has been sitting in the back of my pick up for the last two weeks, so I need to use it and make room for other things.

Thursday, May 8, 2014

Three days until construction begins!!!

Yep, the first post will be in picking out lumber and hardware, and will be posted Sunday or Monday, whenever I'm able to get to Menards.

So stay tuned!

Sunday, April 27, 2014

Only 2 more weeks until construction begins!

I'll finally have enough free time to build the layout, starting about 2 weeks from now.

This layout doesn't have exact dimensions yet, because the modules will be cut to fit. But there are some stats that I can say for sure:

  • Trains will be remote control, battery powered.  I'll focus on my Bachmann porter, but I also have an LGB Stainz which could use remote control as well.  This will eliminate any wiring that would be necessary for other layouts.
  • Layout will be a "Part Time oval" which is a switching layout that can have a loop of track added to it for shows.
  • Detachable staging yard.  Whether it's set up as a shelf layout or as an oval, I'll have a siding ready for use as a staging yard. Probably no more than two tracks wide though.
  • Lightweight plywood construction: I'll be using 1/4 inch plywood for all the modules.
  • Florescent lighting.
  • Painted backdrop.
  • River
  • Tunnel
  • Mine
  • Scratchbuilt buildings
  • Trees
  • Kitbashing railroad cars
  • And weathering just about everything.
Exact bench-work design and my sub-scenery is yet undecided.  But I'll have something developed by the time construction begins.

This won't be your average "how to build a railroad"  This will be more like "How to build a show layout"  which focuses more on design elements and artistic practices than ready-made structures.  I also hope to show anyone who follows this blog that anyone can build a great looking model railroad with a little practice and patience.

So tune in a couple weeks from now for the start of my model railroad, the first one in almost two years!

--James Willmus

Wednesday, April 9, 2014

A Name Change

As the title makes clear, I renamed the project.  Bard Creek, really doesn't have a ring to it, plus I am starting to get more and more involved in the Colorado and Southern, it's equipment, how it operated, etc...

So I renamed the my project railroad to reflect the Prototype more Accurately, plus Clear Creek is easier to remember, and is a bit more catchy than Bard Creek.  Remember, the best railroads have the best names, that's how they are remembered for so long.  While this project might not be first class, it will be traveling and so a name to help it become known, even if it's in the local area, couldn't hurt.

Sunday, April 6, 2014

Major changes

Well, summer housing is taken care of, by means of my trailer; and summer work has been taken care of.  So now I can start focusing on the Bard Creek Railroad again.  All the previous posts looked at a modular design, which I still want to do, but first I'll need to go a bit smaller, so behold the micro layout (for large scale):

This will be 44" by 96", so a little narrower than 4x8 feet.  I need to build the railroad in this manner because of insufficient room for anything larger.  What will be great about this layout is that later I can convert it to 1:13.7 when I am able to construct the actual Bard Creek.

The main problem is storage.  Since the Bard Creek Railroad will be taken to shows, I'll need a much lighter, and larger trailer than what I have now, so instead I'm building a fully enclosed micro that fits in the back of a pickup truck  or an SUV.

One module will be a mining camp while the other will be a mine tipple set in a rocky valley with a small creek.  There will be two turnouts, one per module.  The mine has it's own spur, and then the other acts as an interchange.  Operations will be basic, but fun.  The interchange can be expanded later on to include more mines and such, or I can add modules in between the two halves to create the start of the true Bard Creek.

I wouldn't call this new design a setback, but it is simpler and will be easier to build than the three or four modules I originally envisioned.  Plus it will be highly portable and able to make (hopefully) the following train shows for 2014-2015:


  1. Granite City Train Show, Saint Cloud, MN. Nov 15, 2014
  2. Trees and Trains, Sioux Falls, SD. (TBD)
  3. Granite City Train Show, Saint Cloud, MN. April, 2015
  4. NMRA Thousand Lakes Region, 2015 (TBD)
And perhaps more, depending on dates and schedules and of course the weather and cost of gasoline.  I'm giving myself $500 next winter to use for gas to get to and from train shows, so the above list might just max the budget.

--James

Thursday, February 6, 2014

Bard Creek Railroad System Diagram

After discovering Bard Creek, looking for information about the area's geography, looking up Colorado Central as well as Colorado and Southern railroad information, checking Google maps and creating a route for this fictitious line: I have now gone a step further and created a system diagram; showing where I'd place every turnout, turntable, snow shed, bridge, etc...

So behold, the official Bard Creek R.R. System Map:

You may need to click to expand it to a full view or open it in a different tab.

I did this diagram based off of what I saw in this Satellite image which came from Google Maps, and then I traced the route in a true map fashion:


Technically, the above diagram is the "trackplan" of the whole 5 mile route I made up.  any modules that I build will represent something shown in this diagram.  small modules could simply have a water tower near the creek, larger modules will support mines, snow sheds, and other space-needing scenes.

One quick note to those who ask, "Why have snow sheds?"  Remember that this railroad is supposed to represent Colorado railroads in general, so whatever you find in the state could easily be represented on this railroad.  Plus, snow sheds are cool!

--James

Saturday, February 1, 2014

Some items to remember:

Onlytrains.com has a 1.8 Amp transformer that would be perfect for my set up for $50

Switchcrafters is $153 with shipping and a $127 base price including a turnout, enough rail, joiners, and spikes.

6 train cars by Bachmann that I can modify and turn into my own cars are about $140 without shipping.


Let's talk budget...

So after researching prices for the various things I'll need to build this railway, I've developed a budget which I hope to have matched on my bank account by May when I start construction.  First, let me make a list of what I'll need:


  • 5/8 inch plywood (one sheet per two modules): $25.00
  • 1/8 inch hardboard (two sheets per module): $8.00
  • 1" foam board (two sheets per module): $13.00
  • hardware(nuts, bolts, washers, screws, glue): $25.00 per module
  • Track from switchcrafters: $120.00
  • Ballast, dirt, and soil: $30 est
  • Power supply: $160 or less
  • Lighting: $30.00 per module
  • Rolling Stock (6-8 cars): $180
  • Paint (Black, grey, tan): $20
  • grasses and plants: $30 est
  • Trees: $30 est
  • TOTAL ESTIMATED BUDGET FOR LAYOUT:  $789
Of the things above, items I won't need right away include:

  • Power supply: $160 or less
  • Lighting: $30.00 per module 
  •  3-4 of the rolling stock items: $90
  •  Trees: $30 est

  • The result of leaving out the above items would still give me an operational layout that could be displayed at a show.  Plus, anywhere I can save money I will do so.  That means that the amount I need to worry about raising is: $449 plus about $50 in shipping for online orders and some extra for sales tax.  Therefore I can round up to about $500 as my budget limit.

    Is this a $500 layout?  It built under certain circumstances, then yes.  However, as I pointed out the items I would leave out would have to be added at some point after initial construction.  The power pack would need to be added for sure before the first show.  The other 4 cars would complete the needed rolling stock and trees would be nice.

    However if I can set aside $450 to $500 by May, then this layout will be possible.

    So there is my budget thus far.  Some items may change, although I highly doubt it.

    --James

    Friday, January 31, 2014

    Yet another inspiration...

    While Tom Miller's layout is impressive, the Sundance Central is legendary, the Indiana Large Scaler's have set a standard, there's one other large scale modular group which is noteworthy and that is the Diablo Pacific Shortline group.

    This all volunteer organization has built a modular layout which I hope to build in a similar fashion, many modules that can interlock to form various designs.  While based in the bay area of California, they've gone to shows all through California to everything from major events to hospitals, retirement homes and historic railroads.

    Here's the link to check out their website: http://www.shortline.org/index.php

    --James

    Monday, January 13, 2014

    Durango and Silverton photos

    While this layout will primarily be about the C&S, Colorado Central, Argentine Central, and even the Gilpin tram, I still love the Durango and Silverton with their Denver and Rio Grande Western rolling stock and motive power.  I had the great fortune of being able to visit the D&S during Christmas break, and so the train was ridden and well documented with my Nikon camera.  Even though I already posted the photos on my main blog: jjwtrains.blogspot.com, I feel that this trip relate closely enough to my future F scale project; that the blog documenting the planning and eventual construction of the Bard Creek deserves to have the photos as well.  So without further adieu, below is a copy of my original post from jjwtrains:

    In the great state of Colorado, there are many sites to see and things to do which not only tel of the past, but seem to transport tourists back to a simpler time, a time when a cleaver mid could get you money, but only a gun would keep those riches safe.  A time when thousands were coming across the Great American Desert, better known as the Great Plains, to the mighty Front Range of Colorado.  While many had their own reasons, most came because of one word, GOLD!

    The cry of "Pikes Peak or Bust" resonated in every Midwest and Eastern town on the continent.  It was at this time that a legend was born.  Unlike most legends, this one is a real, hot, breathing, steaming legend.  Also unlike most legends, this one is still known to many Americans simply because it is a monument in American culture.  When mos think of the west, they think of coming into a gold mining town on coaches that seem to radiate gold themselves.  They think of towering peaks in the distance where the gold lies, while the towns surrounding the vast mountain ranges are busy with less profitable, but more stable pursuits such as farming and ranching.  The legend still lives in the most famous narrow gauge train in the world: The Durango and Silverton.

    Originally called the Denver and Rio Grande railroad, the first crews which laid the track which the D&S would still use 130 years later.  Durango was founded in 1880, but the tracks did not arrive inside the town until August, 1881.  Everyone's eyes were set towards the San Juan mountains, the same Mountains which the Spaniards laid eyes upon hundreds of years earlier, but would never penetrate the rocky terrain.  These first white men in the area also had the same goal, find gold.  Te elusive "El Dorado," lost city of gold.  While the city was supposedly in South America, Americans hundreds of years later would realize that a true El Dorado existed, in the Rocky Mountains of Colorado.  Indeed, Spanish explorers were within miles of their goal, but they never found much within the desolate plains and desert which surrounds the great mountains.  Even if the Spanish had found gold, the same problem remained which would plague the early settlers and gold seekers, how do you get gold out of an impassible mountain range?

    That answer was finally steaming towards the mining camp of Silverton in late 1881.  The Crews of the D&RG were working feverishly to get to Silverton as quickly as possible.  Early lessons were learned about building narrow gauge railroads in the Rockies almost ten years earlier as the Colorado Central slowly built their line from Boulder to Silver Plume.  The route was shorter than Durango to Silverton, and yet it almost bankrupt the Colorado Central, and was a major drag on the finances of their sponsor, the Union Pacific.

    Everyone else took notes on the Colorado Central and quickly learned how to balance finances to best get to the towns in the mountains.  The D&RG railroad was using the simply method of building quickly and efficently until reaching the goal.  This eliminated time, which eliminated money.

    The full 45 miles between Durango and Silverton was completed within a year, despite the harsh winter, and despite a near impossible route.  The route between Durango and Silverton was a marvel of Engineering then, and still is today.  In between 1882 and present day was a series of misfortunes and several important events which would eventually kill the D&RG and later the Denver & Rio Grande Western along with the Rio Grande Southern railroad.  However, individuals would emerge, most notably Charles E. Bradshaw, which would put the line back on its feet, this time hauling people instead of ore.  Another great turn of luck was when Hollywood discovered the line and used the railroad to make several movies, no doubt most have seen the westerns with the golden railroad cars in the background.

    Today, the Durango and Silverton is operated as a tourist line, giving passengers a unique view into untamed wilderness and well preserved history.  I had the privilege of riding the famous line over Christmas, 2013.  So what follows are a series of photos showing some of the highlights of the line.  Please enjoy, and feel free to comment if you'd like to add a piece of info or two or if you have a question.  I hope that someday, you too will get a chance to ride this line because, even in the dead of winter, the journey is fantastic!